
Or, How I changed the screen on my iPad 2 in 3 hours.
I was chasing young Jake down the garden as he was up to mischief, iPad in hand. I more or less threw it onto the patio table and it didn’t quite sit on it properly and it fell to the ground. When I’d retrieved the naughty puppy, I went back to check on the damage, hoping the case had protected it. No such luck. The fall had slightly dented an edge and a pretty ray of cracks had appeared across the screen. Luckily, it still worked OK and because of the screen protector, the shattered glass was held in place.
So, I set about learning how to change the broken screen.
I watched an endless video on Youtube, turned that off and found a shorter one from CNET with precise instructions and decided to try it myself. You can view the CNET Youtube video below. Very helpful and to the point.
Apparently, it was a task for an expert but I wasn’t going to let that deter me. I went to Ebay, ordered a new screen. Or, if you want to be technical – a digitizer. Plus a bezier (Yeah! I wondered what that meant too. It’s a very small frame that fits under the glass screen). The instructions on the internet said you need to replace it because it very often gets damaged whilst removing the screen, so I thought I’d better be prepared.
A couple of days later, the repair kit arrived. Cost me just over £10 with free delivery. The instructions with the kit were next to useless. Not quite sure why I had one of those round suckers and a keyring.
So, I thought ‘Now or Never’. If it all goes wrong, I’ll take it to the man at the market who seems to repair everything technical.
Now, before I show you the steps, here are the Very Important Warnings.
- When digging away at the broken screen be very careful wherever there are side or front controls. But especially along the edge where there are no buttons etc. because there is a very flimsy attachment that plugs the top glass screen into the iPad.
- Don’t be tempted to shove your tools right under the screen (further than the outside frame) you’ll scratch the delicate LCD screen underneath. (I did this very slightly in my excitement as the screen started lifting) Luckily there was only a tiny mark at the very edge.
- Don’t touch the LCD screen with your fingers. If you do, you can clean it with a lint free cloth and rubbing alcohol.
Right! Down to business.
- Put on some nice fitting vinyl gloves to protect your hands. Get your hairdryer out on the hottest setting but not too breezy, or you’ll start blowing tiny fragments of glass all over the place. I stuck some sellotape across the front edges after I discovered this little problem so, as you chip away and the glass keeps fragmenting, it stays attached to the sellotape. Play the dryer over one corner. This will melt the glue underneath and you can gradually start to lift it. I found their metal tool a little useless for this as there’s hardly any gap to get leverage. So, I got my trusty scalpel out and very gently eased it under. I did snap the blade once and was more careful after that. Once you’ve got a bigger gap, you can then use the metal lever that comes with the replacement screen. As in the warnings above, be very careful not to damage the internal workings of switches etc.
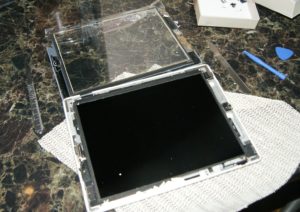
As you can see in the photo, a lot of pieces remain round the edge - If your screen is cracked, you will find it impossible to remove it in one piece. Stick sellotape on the top of the screen just around the edges, like a frame. This will help keep all the fragments together. Don’t be disheartened if this takes a couple of hours or so. I don’t think Apple want you to be able to do it too easily as they would like you to pay them to mend it.
- Once you’ve removed the digitizer just fold it open like a book where it’s attached to the rest of the iPad. You must make sure you remove every bit of glass and the clean the frame with something like rubbing alcohol. You don’t want any gritty bits or grease affecting the fitting of the new digitizer.
- Now you need to unscrew the LCD Panel and remove it so you can unplug the digitizer. There are four tiny screws. One in each corner. Be really careful you don’t lose them or drop them inside your iPad. You might neve see them again! Gently remove the LCD without touching the top of it with your hands and marking it. Any glass fragments should be blown off with your hairdryer or a puffer used for cleaning camera lenses. If there are any finger marks use a lint free cloth to gently wipe it clean.
- Put the LCD screen to one side either in a clean plastic bag or somewhere it won’t get dusty or dirty.
- You need to lift up two little gates where the flat plastic connector is located. These are quite tiny and I found flicking them up with my scalpel GENTLY was the easiest option.
- Peel off the plastic and slide it out from the connectors.
- At this stage, some people want to add a new bezier as this can get damaged whilst removing the digitizer. I didn’t need to do this but if you do, you need to remove another connection to get to it. You can see these instructions in the video above.
- Get your new screen and slide the thin plastic attachment into the connector. Don’t forget to close the gates on it and replace the LCD along with the tiny screws. These screws become magnetised with your screw driver, so with care, makes it easier to get them into place.
- Gently remove the protective layer from the underside of your new screen (digitizer), peel off the backing from the stickers round the edge and carefully line up the camera end with it’s little prongs into the corresponding holes on your iPad. The digitizer I bought had a new camera and switch attachment already in place, so, I didn’t have to faff about removing and replacing the old ones.
- Gently place it down on your iPad and push into place once it’s nicely lined up. You will need to fiddle about with the connector to make sure it doesn’t get pinched under the screen edge. My old digitizer was white but I decided I wanted a black one for a change.
- Voila! As long as you haven’t cut through or damaged any of your controls, it should all work brilliantly.
- I wouldn’t have said this task was really difficult but you do need a lot of patience as it takes so long to remove all the glass fragments. And you have to be careful not to damage integral parts.

Footnote: I was really pleased with myself for accomplishing this task, however, there was one not so small problem later on, which wasn’t my fault. The screen hadn’t stuck down firmly enough. I’ve since read on the internet that the double sided sticky tape doesn’t hold well. So, I gently tried to remove the screen and managed to crack it again – Grrr!
Back to Ebay and ordered another screen. An even cheaper one without the Bezier frame and camera lens provided. When this arrived, I went through the process again, only this time I had to attach the camera lens to it and place their sticky tape in all the right places. These tasks were fiddly and I wished I’d bought the same screen as before, it wasn’t worth the money saving in my opinion. Luckily, I had the old broken screen, so I could see exactly where the strange shaped tapes had to go.
Again, it didn’t stick well, so I managed to lift the screen without breaking it this time and used Gorilla Glue to stick it down. Now it’s very firmly fixed. Just a warning. When using Gorilla Glue, use the tiniest amount as it grows when activating and you don’t want it seeping on to the LCD screen or out of the edge.
It was annoying having to buy the extra screen but still worked out a lot cheaper than getting the man in the market to do it 😊